
Pages and posts
Everything on your site lives under Content in the top bar. Click it to see each kind of content your site has, such as Pages, Posts or Events, then pick one to see its list. Below them are Taxonomies (categories, tags and the like, see Categories and tags) and Templates (the shared layouts, see Using the page editor).
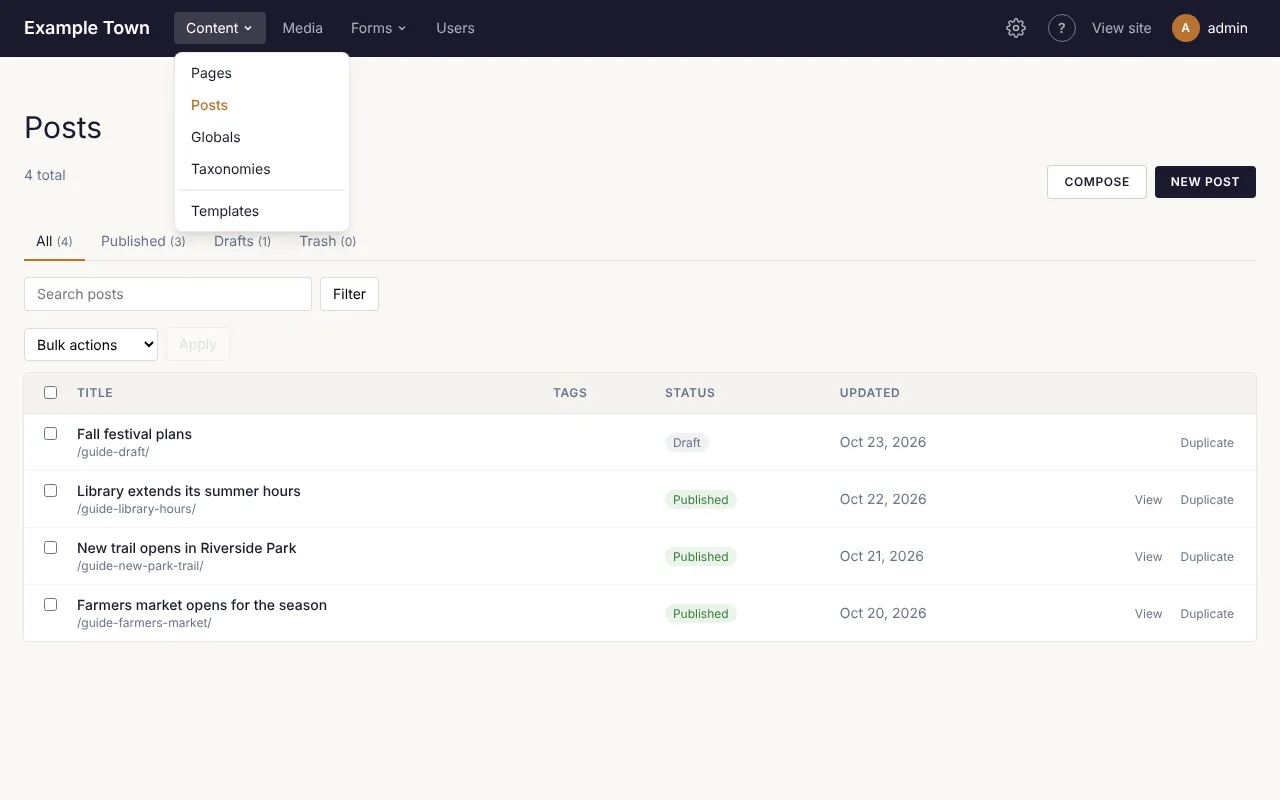
The content list
Section titled “The content list”The heading names the kind of content, and the line under it says how many there are (for example 12 total). Things in the trash aren’t counted.
What each row shows
Section titled “What each row shows”| Column | What it shows |
|---|---|
| The tick box | Ticks the row for doing the same thing to several at once. The box in the heading row ticks or unticks every row. |
| Title | The title, with the page’s address underneath (for example /about-us/). Click the title to open it in the editor. A page with no title yet shows (no title). A star (★) means it is featured. |
| Tags | The page’s tags. Click one to see everything with that tag. |
| Status | Published (on the site), Draft (not on the site) or Trash. A published page with edits that aren’t live yet also says Unpublished changes. |
| Updated | When it was last changed. For events this column is Starts instead, the event’s start date. |
| (last column) | View opens a published page in a new tab, as visitors see it. Duplicate makes a copy (see Making a copy). |
The newest changes are at the top. Event lists are in order of start date instead, the latest first. The list shows up to 500 at a time: if you have more, use the search box or a filter to find older ones.
Some kinds of content have no page of their own (for example venues, which only appear on the events held there). Their rows show no address and no View: a venue shows its address instead. Clicking one opens a short form with its Name, Status and details, and a Save button, rather than the page editor (see Events and tickets).
Status tabs
Section titled “Status tabs”Above the list are four tabs. The number beside each is how many it holds.
- All: everything except the trash.
- Published: what is on your site now.
- Drafts: not on your site yet, or taken off it.
- Trash: deleted, but not gone for good (see Deleting).
Finding something
Section titled “Finding something”Under the tabs is a row of filters. Fill in what you need, then click Filter:
- Search: type a few words of the title. Searching looks at titles only, and capital letters don’t matter.
- All tags: pick a tag to see only what has it. To go back to everything, click Clear tag beside the Filter button. (This box only appears once your site has tags.)
- Featured only: tick it to see only featured content. It only appears for kinds of content that can be featured.
The search and filters stay in force when you switch between the status tabs. If nothing matches, the list says Nothing here yet., Nothing with this tag. or, in the trash, The trash is empty.
Adding a new page or post
Section titled “Adding a new page or post”- Click Content, then the kind of thing you want to add (for example Pages).
- Click the New button in the top right (it says New Page, New Post and so on).
- The page editor opens with an empty page, titled (untitled) at the top. Type a title in the Title box on the right.
- Add what you want on the page (see Using the page editor).
- Click Publish when it is ready for visitors, or leave it as a draft for now (see Saving and publishing).
Prefer to start from a document you already have? Click Compose beside the New button instead. See Writing with Claude.
To start from one of your templates or patterns, use Make a page in Content, Templates (see Using the page editor).
Page addresses
Section titled “Page addresses”Each page has an address, shown at the top of the editor beside its title (for example /about-us/;
the home page shows /). It is kept in the Slug box in the page’s settings, on the right of the
editor.
- On a new page, the address follows the title as you type it: “About us” gives
about-us. It keeps following until the page is published, or until you type an address of your own in Slug. - Once a page is published, changing its title no longer changes its address. Links people have saved keep working.
- Only small letters, numbers and hyphens. Anything else you type in Slug becomes a hyphen, and capitals become small letters.
- Two pages can’t share an address. Some kinds of content share one set of addresses (on many
sites, pages and posts both live at
/<address>/). If you give a page an address another one already has, it isn’t saved, and the top of the editor says why, for example The address “events” is used by the page “Events”. Choose another. Change the Slug and save again.
Changing the address of a published page
Section titled “Changing the address of a published page”Change the Slug and publish the change (Publish changes). Until then the page stays at its old address. Once it is live, the old address keeps working and sends visitors to the new one: a redirect is added for you. Admins can see and change redirects under Settings, Redirects (see Redirects and missing pages).
Making a copy
Section titled “Making a copy”Duplicate makes a draft copy of a page and opens it in the editor, ready to change. It is a quick way to start a page that looks like one you already have. You’ll find Duplicate at the end of each row in the list, and at the top of the editor.
The copy:
- is titled like the original with “(copy)” at the end, and has its own address;
- is a draft, so nobody sees it until you publish it;
- has the original’s content, excerpt, featured image, template, tags, categories and other settings (and an event’s dates);
- starts from the original’s latest saved version, including changes that aren’t published yet;
- has no history: earlier versions stay with the original.
If you click Duplicate in the editor while you have changes that aren’t saved yet, a box warns you that the copy is made from the saved page. Click Cancel, wait for the change to save, and try again.
Doing the same thing to several at once
Section titled “Doing the same thing to several at once”- Tick the box beside each one in the list (or the box in the heading row for all of them). The number ticked shows beside the buttons, for example 3 selected.
- Pick an action from Bulk actions.
- Click Apply. (It can’t be clicked until something is ticked and an action is chosen.)
A line at the top of the list then says what happened, and what was skipped and why.
| Action | What it does |
|---|---|
| Publish | Puts drafts on your site. A page still at its first, temporary address gets one made from its title. |
| Move to drafts | Takes published pages off the site and keeps them as drafts. |
| Move to trash | Takes them off the site and puts them in the trash. |
| Mark featured / Unmark featured | Turns the Featured switch on or off. Only for content that can be featured. |
| Add a term… | A second box appears: Choose a term, listing your categories, tags and other terms, grouped by taxonomy. Pick one and click Apply to add it to every ticked page. |
| Remove a term… | The same, to take a term off them. |
In the Trash tab, the actions are Restore (as drafts) and Delete permanently instead.
What gets skipped
Section titled “What gets skipped”Publish leaves some pages alone and names them in the message at the top:
- a page with no title (give it a title first);
- a page whose address another page already has (change its Slug first);
- when your site checks accessibility before publishing (an admin turns this on), every page with a page of its own: publish those from the editor, where the check runs first (see Accessibility).
Move to trash skips the home page.
Adding or removing a term changes published pages straight away, and also their unpublished changes for tags. The message says how many pages it changed, and how many already had it (or didn’t have it). If someone has one of those pages open in the editor at the time, they are asked before their next save overwrites the change (see When two people edit the same page).
Deleting
Section titled “Deleting”- Tick the pages in the list.
- Choose Move to trash from Bulk actions and click Apply.
The page comes off your site but isn’t gone. To bring it back, open the Trash tab, tick it, choose Restore (as drafts) and click Apply. It comes back as a draft: publish it again when you are ready.
To remove something for good, open the Trash tab, tick it, choose Delete permanently and click Apply. A box asks you to confirm, because this can’t be undone. Only things already in the trash can be deleted permanently.
Categories and tags
Section titled “Categories and tags”Categories, tags and any other ways your site sorts content are called taxonomies. Each category or tag is a term. They group related content, so visitors can find everything on one subject: many sites show a page for each one, listing everything filed under it.
- Categories can sit under each other (Events, then Concerts under it).
- Tags are a flat list of keywords, and every kind of content can have them.
Choosing them for a page
Section titled “Choosing them for a page”With nothing selected in the editor, the page’s settings on the right include a box for each taxonomy that kind of content uses.
Categories (and other taxonomies like them) are a list of tick boxes, with terms that sit under others indented beneath them. Tick each one that applies. The ones ticked are listed above the boxes. When there are more than 12, a Find box above them (Find categories, for example) narrows the list as you type. If the taxonomy has no terms yet, it says None yet: add them under Content > Taxonomies.
Tags are a single box:
- Click in the Tags box. A list of your tags opens.
- Type to narrow the list, then click a tag, or use the arrow keys and press Enter. Click it again to take it off.
- To make a new tag, type it and press Enter (or a comma), or click Create “…” at the bottom of the list. A new tag joins your list of tags once the page is saved (on a published page, once you publish the change).
- To remove a tag, click the × on it, or press Backspace in the empty box to remove the last one.
Like everything in the page’s settings, categories and tags go live when you publish.
The Taxonomies screen
Section titled “The Taxonomies screen”Click Content, then Taxonomies, to look after the terms themselves. There is a tab for each taxonomy, with how many terms it has. Under the tabs, a line says which kinds of content use it.
To add a term:
- Type its Name.
- Leave Address (optional) empty to make one from the name, or type your own.
- Choose where it goes in Under: (top level) or under another term. (Tags, and other flat lists, don’t have this.)
- Click the Add button (it says Add category, Add tag and so on).
You can also make new tags straight from a page’s settings.
Each term’s row shows its Name, its Address, which Template its page uses (when terms have pages) and how many entries use it (Used on, or Not used). At the end of the row:
- Save: to rename a term or change its address, type in its Name or Address box, then click Save on that row. When terms have pages, the old address keeps working and sends visitors to the new one.
- Details: opens a box for the term’s description, picture and search settings (see below).
- View: opens the term’s page on your site, listing everything filed under it.
- Delete: asks to confirm, then deletes the term. It is taken off every page that had it (the box says how many), and the terms under it move up a level. Your pages themselves stay.
Two terms of one taxonomy can’t have the same address: saving one says Another term already uses the address “…”.
Putting terms in order
Section titled “Putting terms in order”Terms are listed in the order you give them, which is also the order visitors see them in, for example in a list of categories to filter by.
Each term has a handle (six dots) to the left of its name. Drag it:
- onto the top or bottom edge of another term, to put it just above or below that term;
- onto the middle of another term, to put it underneath that one;
- onto Drop here to move to the top level, which appears above the list while you drag.
A line or an outline shows where it will land. A term can’t go under itself or under one of its own terms.
Without a mouse: move to the handle with the Tab key and press Enter. A small menu opens with Move up and Move down, and (for categories) Move under: choose a term, or (top level), then click Move. Press Escape to close the menu.
A term’s details
Section titled “A term’s details”Click Details on a term’s row. The box has:
- Description: a few sentences about the term, shown on its page and used as its description in search results when its SEO has none.
- Featured image: a picture shown on its page and when the page is shared.
- Fields: any extra details your site keeps for these terms.
- SEO: how its page appears in Google, as for a page (see Using the page editor).
Compose at the top fills these in for you from the term’s name and what is filed under it. Type anything Claude should know in the box above (it is optional), then click Compose. Check what it wrote. Nothing is saved until you click Save; Cancel closes the box without saving.
The template a term’s page uses
Section titled “The template a term’s page uses”When a taxonomy’s terms have pages, each row has a Template box. Default uses the taxonomy’s template, or the one set on a term above it. Terms under a term with its own template share it.
To set the same template for several terms at once, tick their boxes, choose it in the box above the list (Template for the ticked categories, for example) and click Apply.
Admins can add taxonomies of their own and choose which kinds of content use them (see Kinds of content and taxonomies).
Featured content
Section titled “Featured content”When an admin has turned on Featured for a kind of content (see how), each one has a Featured switch in its settings, under Details. Then:
- in the list of that content, a star (★) marks the featured ones;
- tick Featured only and click Filter to see just those;
- tick several and choose Mark featured or Unmark featured from Bulk actions;
- a Collection block can show featured content only (see Using the page editor).
Marking something featured from the list takes effect on the site straight away, and is kept in any unpublished changes too.
Members-only pages
Section titled “Members-only pages”When your site has members (an admin turns this on, see Turning features on), a page’s settings have a Members section. Turn on Members only and, if your site has several levels, tick the levels that may see it (none ticked means every member). Everyone else sees its title, excerpt and featured image with a sign-in link, and it is left out of lists and search for them. Like other settings, it takes effect when you publish.