
Images and files
All your pictures, videos and documents live in Media, in the top bar. Anything there can be used on any page, and anyone who edits the site can use it.
The Media screen
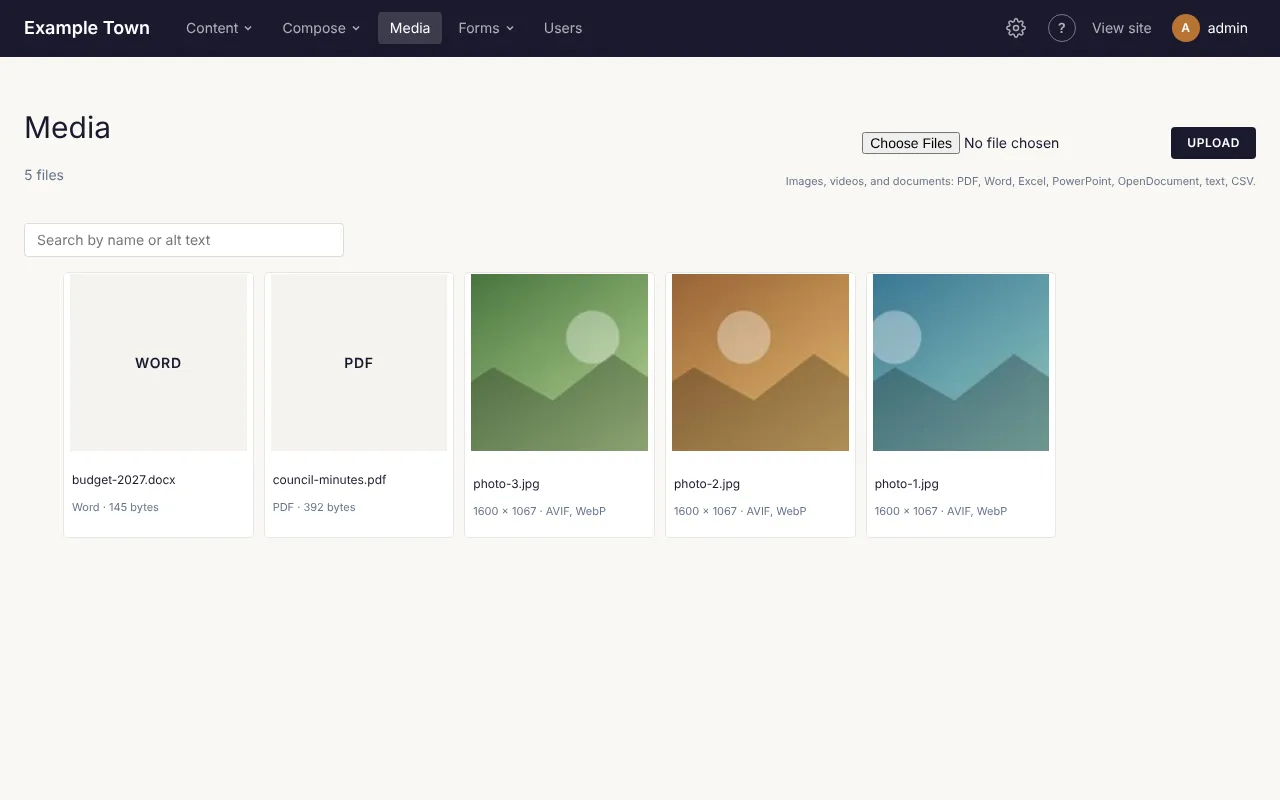
Section titled “The Media screen”Click Media in the top bar. You see:
- how many files the site has (for example 240 files);
- the upload box, top right;
- a search box;
- your files, newest first, 60 to a page. Use Previous and Next at the bottom to see more.
Each file shows a small preview (videos and documents show their type, such as PDF or Word), its file name and a line of details: a picture’s size in pixels, a document’s type and size. AVIF, WebP means the site has made lighter copies of the picture for fast loading, and focal point means someone has chosen which part of it stays in view (see Keeping the important part in view).
Click any file to open its details.
Uploading files
Section titled “Uploading files”From the Media screen
Section titled “From the Media screen”- Click Media in the top bar.
- Click the file box at the top right (most browsers call it Choose Files) and pick the file on your computer. To upload several at once, hold Ctrl (Cmd on a Mac) or Shift while you click them.
- Click Upload.
The line under the box shows how it is going, for example Uploading 2 of 5: garden.jpg…. When all the files are done the page reloads with them at the top. If any file was refused, a message lists each one with the reason first.
From the page editor
Section titled “From the page editor”Wherever a block or a setting takes a picture (an Image block, a Hero, a Cover, a page’s Featured image and so on), click Choose. A window opens with your files:
- Click a file to use it.
- Search media finds a file by its title, file name or alt text.
- Upload adds a new file from your computer and puts it in the list, ready to click.
- Close goes back without choosing.
The window shows only files of the right kind: pictures for a picture setting, videos for a video, documents for the File block.
What you can upload
Section titled “What you can upload”| Kind | Types | Largest |
|---|---|---|
| Pictures | JPEG, PNG, WebP, AVIF, GIF, SVG and other picture files your browser offers | 90 MB |
| Videos | MP4, WebM and MOV | 200 MB (see the note below) |
| Documents | PDF, Word, Excel, PowerPoint, OpenDocument (text, spreadsheet, presentation), plain text and CSV | 50 MB |
What the site does with a picture
Section titled “What the site does with a picture”You don’t need to resize photos before uploading. The site does it for you:
- A picture wider or taller than 2560 pixels is scaled down to 2560 for use on pages. The original is kept as well.
- Smaller copies are made for phones, tablets, lists and thumbnails, so visitors download no more than their screen needs.
- JPEG and PNG pictures also get lighter copies in the newer AVIF and WebP formats, which browsers that can use them load instead.
- Photos in iPhone (HEIC), TIFF or BMP format are turned into JPEG.
- SVG drawings, GIFs and animated pictures are kept exactly as uploaded, with no smaller copies, so an animation keeps moving.
File names
Section titled “File names”The site tidies the file name: capitals become small letters, and spaces and other symbols become
hyphens, so Summer Fair 2026.JPG is stored as summer-fair-2026.jpg. If a file of that name is already
there, the new one gets a number (summer-fair-2026-1.jpg); nothing is ever written over. The file’s
Title starts as its name without the ending, and you can change it in its details.
When an upload is refused
Section titled “When an upload is refused”| The message says | What it means |
|---|---|
| Only images, videos (MP4, WebM, MOV) and documents (PDF, Word, Excel, PowerPoint, OpenDocument, text, CSV) can be uploaded here | The file isn’t a kind the site takes. Save it as one of those, for example a PDF. |
| Documents can be up to 50 MB | Make the document smaller, for example by saving a PDF with smaller pictures in it. |
| Files can be up to 90 MB here | The picture or document is too big. Make it smaller and try again. |
| Videos can be up to 200 MB … | The video is too big. Shorten it, or put it on YouTube or Vimeo. |
| That file isn’t a PDF file inside, whatever its name says. (or Word, Excel…) | The file’s ending doesn’t match what is in it, for example a web page renamed to .pdf. Open it in its own program and save it again in the right format. |
| Another upload took this name at the same moment: upload the video again. | Two videos with the same name were uploaded together. Upload this one again. |
Finding a file
Section titled “Finding a file”Type in the search box on the Media screen (Search by name or alt text) and press Enter. It finds files whose title, file name or alt text contain what you typed. That is one more good reason to write alt text and clear titles.
A file’s details
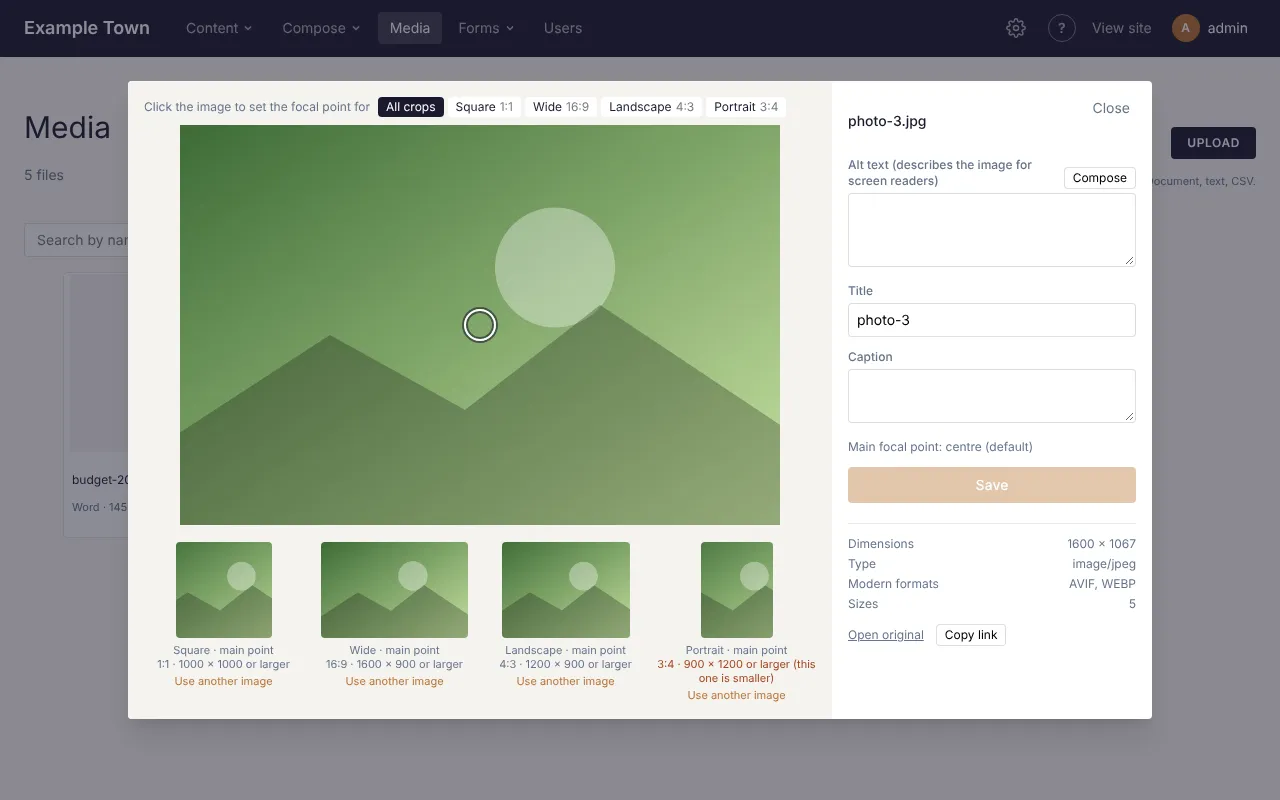
Section titled “A file’s details”Click a file on the Media screen to open its details. The file is on the left and its settings on the right. Close (top right), Escape, or a click outside the panel closes it.
Pictures
Section titled “Pictures”- Alt text (describes the image for screen readers): a short description of the picture, read aloud to people who can’t see it and shown if the picture doesn’t load. Write what someone would need to know, for example “Children planting flowers at the community garden”. Leave it empty only for pictures that are purely decoration. See Accessibility for more on writing it.
- Title: a name for your own use, shown in the library and used as the link’s words when you link to the file.
- Caption: a line of text about the picture, such as who took it.
Then click Save. Save stays greyed out until you change something; Saved appears in green once it is done.
The alt text you write here is used wherever the picture appears, unless a block gives it its own alt text. When you choose a picture in an Image block, the block’s own Alt text box is filled from here if it is empty.
Not sure what to write? Click Compose beside Alt text. Claude looks at the picture, with its file name, title, caption and any alt text it has already, and writes one sentence into the box. The button reads Writing… while it works, then Written by Claude: check it, then Save. appears. Read it and change anything that isn’t right (it can’t know people’s names or places unless the title or caption says them), then click Save. Nothing is saved until you do. Adding a title or caption first gives it more to go on.
Under the Save button the panel lists the picture’s Dimensions, file Size, Type, Modern formats (AVIF, WEBP when the lighter copies are made, Pending while they are still being made, or Not applicable for files that don’t get them) and how many Sizes were made.
At the bottom:
- Open original opens the full picture in a new tab.
- Copy link copies the picture’s full web address, to paste into an email or a message. Link copied confirms it. If your browser won’t allow it, the panel says Could not copy: open the file and copy its address instead.
Videos
Section titled “Videos”A video’s details show a player, so you can watch it, with its Title and Caption, its Size and Type, Open original and Copy link. Videos have no alt text or focal point.
Documents
Section titled “Documents”A PDF’s details show the document itself, so you can scroll through it. Other documents (Word, Excel and so on) say No preview: open the file to see it. Documents have a Title and Caption, their Size and Type, Open file and Copy link. They have no alt text or focal point.
Keeping the important part in view
Section titled “Keeping the important part in view”Pictures are often cropped to fit a shape: a square on a list of posts, a wide strip across a banner. By default the site keeps the middle. To choose which part always stays in view, set the picture’s focal point.
- Open the picture’s details in Media.
- Click on the most important part of the picture (a face, a building). You can also drag across it. A ring marks the spot.
- Look at the four small previews underneath: they show how each crop will look.
- Click Save. The message Saving and re-cropping thumbnails… shows while the site makes new crops around your point.
The line under Caption shows the point, for example Main focal point: 40%, 30%, or centre (default) when none is set. Reset beside it goes back to the centre.
A different point for each shape
Section titled “A different point for each shape”The four previews are the shapes the site crops to most:
| Shape | Proportions | Sharp from |
|---|---|---|
| Square | 1:1 | 1000 × 1000 pixels |
| Wide | 16:9, like a TV screen | 1600 × 900 pixels |
| Landscape | 4:3 | 1200 × 900 pixels |
| Portrait | 3:4 | 900 × 1200 pixels |
Sometimes one point doesn’t suit every shape: a group photo might need the faces in the middle for a square but the left-hand side for a wide strip. Above the picture is a row of buttons after Click the image to set the focal point for: All crops, Square, Wide, Landscape and Portrait.
- Click a shape’s button (or click its preview underneath).
- Click the picture where that shape should centre.
- Click Save.
Under each preview, main point means the shape uses the main focal point, and own point means you set one just for it. reset beside own point goes back to the main point. Click All crops to go back to setting the main point.
A crop whose shape is close to one of these four (within about 15%) uses that shape’s point.
When a crop comes out small
Section titled “When a crop comes out small”Under each preview is its shape and the smallest picture that fills it sharply, such as 16:9 · 1600 × 900 or larger. If it adds (this one is smaller), in orange, the picture has too few pixels for that shape and the crop may look a little blurry on big screens. Use a larger photo, or use another image for that shape (below).
Using another image for one shape
Section titled “Using another image for one shape”If a picture just doesn’t work in one shape (a tall portrait that looks wrong as a wide banner, say), you can choose a different picture to be used only for that shape.
- Under that shape’s preview, click Use another image.
- Pick the other picture from the window that opens.
- With that shape selected, the panel shows the other picture and says, for example, The wide crop uses another image. Click it to set its focal point for this crop; it applies only here. Click it to set its point.
- Click Save.
From then on, wherever this picture is cropped to that shape (a block set to that Aspect ratio, or the small square thumbnails), the other picture is shown instead, with the focal point you set for this use and its own alt text (or this picture’s, if it has none). The other picture’s own focal points stay as they were.
Under the preview, Use a different image swaps in another one, and Remove goes back to cropping this picture.
Choosing pictures and videos in blocks
Section titled “Choosing pictures and videos in blocks”Wherever you can add a picture or a video, a small preview shows what is chosen, with:
- Choose (when nothing is chosen yet) or Replace (to pick another), which opens the media window.
- Edit, which opens the file in Media in a new tab, to change its title, caption, alt text or focal point. Save there, then come back to your page.
These pickers appear in the Image, Hero, Cover, Media & text and Video blocks, a page’s Featured image, and the Share image in its SEO settings. Blocks in general are covered in The page editor.
The Image block
Section titled “The Image block”Besides the picture, the Image block has Alt text (describes the image) (for this place only; it wins over the library’s), Caption, Link, Placement, Image size (from Thumbnail (150px square) up to Full (the original)), Aspect ratio (Original, Square (1:1), Wide (16:9), Landscape (4:3), Portrait (3:4), Photo (3:2), Tall (2:3), Cinema (21:9), Banner (3:1) or Story (9:16)), Fit (Cover (crop to fill) or Contain (show the whole image)), Circle, Fill the block behind the content and Shade (darker towards the bottom).
Focal points for one block
Section titled “Focal points for one block”The Hero, Cover and Image blocks can have their own focal point for each screen size, for when the picture’s own point from Media isn’t right in that place.
- Select the block.
- Under Focal point, pick Desktop, Tablet or Phone.
- Click the picture where it should centre on that size of screen. The small preview beside it shows how it will be cropped.
A size you have set shows a dot after its name (Phone •). The line underneath says Now: the image’s own focal point, from the media library. for a size you haven’t set (or (the centre) when the picture has no point either); click Use the image’s own to go back to it after setting one.
- On Hero and Cover, the desktop crop is wide (16:9) and tablets and phones are tall (3:4). Tablet means screens up to 1024 pixels wide, phone up to 599.
- On an Image block, Focal point appears only when the picture is cropped: when an Aspect ratio is set, Fit is Cover (crop to fill), or Fill the block behind the content is on. All three sizes use the block’s aspect ratio (4:3 if none is set).
- A Cover set to Use the page’s featured image has no Focal point here: set it on the featured image in Media.
- Choosing a different picture clears the block’s own focal points.
Image galleries
Section titled “Image galleries”The Image gallery block (under Media in Blocks) shows several pictures together.
- Add an Image gallery block and select it.
- Click Add images. In the window, click each picture you want: each gets a number showing its order. Click a picture again to leave it out.
- Click Add 4 selected (the number is how many you picked).
Each picture becomes its own image inside the gallery, with its alt text from the library. Select an item in the gallery to change, reorder or remove it: select one picture to change its alt text or caption, drag it to move it, or delete it.
Gallery settings
Section titled “Gallery settings”- Display: Grid, Masonry (columns of pictures at their own heights, like a pinboard) or Slider (a row visitors move through).
- Columns (for a slider, Visible at once): how many across, 3 if empty.
- Image shape (grid and slider): As uploaded, or one of the aspect ratios listed for the Image block above, so every picture is the same shape.
- Crop images to fit (a grid with As uploaded): crops the pictures to line up neatly. Turn it off to show each one whole.
- Gap: the space between pictures.
Under Style:
- Corners: Square, or rounded: Small, Medium or Large.
- Each item’s caption: Below it, Over the image (on a dark fade) or Hidden.
- On hover: Nothing, Zoom the image or Lift.
A slider also has Slider settings:
- Arrows: Round, Square, Plain (no background) or None.
- Arrows’ place: Over the items, Either side or Below.
- Arrows’ background (and the current dot) and Arrows’ colour, from the site’s colours.
- Dots: a dot for each stop, to jump to it.
- Show part of the next item, so visitors can see there is more.
- Advance automatically, and how many Seconds per item (2 to 20). It pauses while someone hovers over it or uses it, and doesn’t move at all for visitors whose device is set to reduce motion.
Copy styles and Paste styles carry these settings to another gallery (see Copying a block’s look).
Video galleries
Section titled “Video galleries”The Video gallery block shows videos the same ways: Grid, Masonry or Slider.
- Add uploaded videos picks video files from Media (several at once, as for pictures).
- Add YouTube or Vimeo links: paste the videos’ web addresses, one per line, and click Add links. Each becomes a player. Anything that isn’t a YouTube or Vimeo link stays in the box with the message Not a YouTube or Vimeo link: and the address.
Its settings are the same as an image gallery’s, except that it has no Image shape, no Over the image captions, no Zoom the image and no Advance automatically.
The Video block
Section titled “The Video block”For one video file, add a Video block and in its settings:
- Video: click Choose to pick one from Media or upload it. Large videos take a while to upload.
- Or a video file’s address: instead of choosing one, paste the address of a video file kept elsewhere (an MP4 file, not a YouTube page).
- Poster image (shown before it plays): a picture shown until the video starts. Remove the poster takes it away.
- Caption, Autoplay (muted), Loop and Show controls (on unless you turn it off).
The Embed block takes the code a video or map service gives you for embedding (paste it into Embed HTML). With only a URL filled in, it shows as a plain link.
Documents (PDFs, Word, Excel…)
Section titled “Documents (PDFs, Word, Excel…)”You can upload documents to Media just like pictures: PDFs, Word, Excel and PowerPoint files, OpenDocument files, plain text and CSV, up to 50 MB each. You can choose several files at once.
Then link to them from a page in any of these ways.
The File block
Section titled “The File block”The File block (in Blocks, under Media) shows the document’s name as a link, its type and size (for example PDF · 1.4 MB) and a Download button. In its settings:
- File: Choose opens the media window showing only documents; Replace picks another; Edit opens it in Media in a new tab.
- Or an address: instead of a file from Media, the address of a document kept elsewhere.
- Link text: the words of the link. Empty, it uses the document’s title.
- Show its type and size: on unless you turn it off. (Shown only for files from Media.)
- Button: the button’s words, Download to start with. Empty the box for no button.
The link opens the document (a PDF in the browser); the button saves it to the visitor’s computer.
A link in text or on a button
Section titled “A link in text or on a button”- From some words in a paragraph: select the words, click Link above the text box, then Media library, and pick the document. If no words are selected, the document’s title is put in as the link’s words.
- From a button (or an image or hero): click Find beside its Link box, then Media library, and pick the document.
The Media library button there lists every kind of file: pictures, videos and documents. Links are covered in more detail in The page editor.
In an email or a message
Section titled “In an email or a message”To put a document’s address in an email or a newsletter, open it in Media and click Copy link. Every picture and video has Copy link too.
Files are never deleted
Section titled “Files are never deleted”There is no delete in Media. Pictures, videos and documents stay in the library for good, so a file used on an old page, in an email or in a link someone saved can’t go missing by accident. To stop using a file, remove it from the page or replace it with another.